Friday, August 10, 2012

The Map Project

Art House Co-op, sponsors of the Sketchbook Project, always have a lot of great projects to keep artists inspired and creating.  I occasionally like to participate in these, because they make me really think and try to be creative.  They help get me out of the ruts I can tend to get into.  One of the projects I did was the Map Project.  Here's the gist of the project (from the Art House Co-op website):


The Map Project

What does your world look like?
From Google’s satellite imagery to the directions we sketch on napkins, maps of all kinds help us make sense of our surroundings. The Map Project is an opportunity to channel your inner cartographer and create a map of your world. Chart your neighborhood, depict your hometown or plot out the landscape of your dreams — The Map Project is open to representations of any environment. We’ll transform our storefront exhibition space into a communal atlas, guiding visitors to places both real and imaginary.

"Mind Map of My Month: March 2012"

With this project, I really challenged myself to think outside of the box.  I knew I didn't want to try to draw a map of a real place...a cartographer I am NOT.  I'm not really sure where I got the inspiration for the mind map--most likely online somewhere.  I heard of using a mind map to organize your to-dos, and I am super forgetful, so I'm always trying to find ways to stay on top of things.  I made myself a mind map, and of course, the artist in me had to make it pretty!  I originally made my map in a little book I have, but I redrew it on different paper to fit the format for the Map Project.  This mind map is a really great way for a very visual person like myself to stay organized!

Donna : )

Thursday, August 2, 2012

Sketchbook Project 2013!

You may remember that last year, I participated in the Sketchbook Project 2012.  Well, now I'm gearing up for the Sketchbook Project 2013 (if you'd like to sign up, click here--sign up by October 31, 2012)!


For those not familiar with this project, you receive a small sketchbook, fill it up, and send it back.  It then goes on tour...kind of like a concert tour for sketchbooks.  People line up in these different cities to look through all of the sketchbooks.  Pretty cool!  At the end of the tour, the sketchbooks go back to New York and are archived permanently at the Brooklyn Art Library, where they can be viewed.

My new sketchbook, a cute little "sketchbook sleeping bag," and a pencil made from reclaimed denim.  Sketchbook Project 2013, here I come!

I also wanted to let everybody know that my sketchbook from the 2012 tour is digitized online!  You can go take a look at the whole book: click here!  I'll post some pics from the new sketchbook once I actually get started.


Donna : )

Tuesday, February 21, 2012

Sketchbook Project 2012

"The Sketchbook Project is a constantly evolving library of artists' sketchbooks from across the globe.


This year thousands of sketchbooks will be exhibited at art spaces in 14 cities. After the tour, they will join the collection of the Brooklyn Art Library and made available to the public seven days a week."
I signed up to be a part of the Sketchbook Project 2012--they sent me my little sketchbook, I filled it up and sent it back.  I just think it's super cool that my sketchbook is now going on tour and people from all over will be able to look at it!

When signing up for the project, I had to pick a theme for my sketchbook from a list.  I chose "Travel With Me" as my theme, and had originally planned on drawing different places that I went.  The first drawing in the book is of the Portofino Bay hotel in Orlando, Florida, which looks almost exactly like Portofino, Italy.  After that, my idea completely changed.  I'm going to Italy in May of this year, and I am currently learning to speak Italian (thanks to Rosetta Stone), so I decided to use my sketchbook to chronicle my language-learning efforts.

If you'd like to see more of my Sketchbook Project 2012 drawings, check out my Facebook page.


The tour starts in April 2012, and here's where it's going:


  • Greater Boston Area
    July 6th-8th
    LynnArts
    25 Exchange Street
    Lynn, MA
  • Portland, ME
    July 11th-14th
    SPACE Gallery
    538 Congress Street
    Portland, ME 04101
  • Toronto, Canada
    July 18th-22nd
    The Gladstone Hotel
    1214 Queen St. W
    Toronto, ON
 
*As of now, the London and Melbourne exhibitions will be limited to books from their respective continents. All other tour dates will include every single book submitted to this year's project.


Ciao,
Donna : ) 

Wednesday, September 14, 2011

"What's That?" Wednesday

Well, it's Wednesday again, and here's a little something that my high school Visual Arts 2 students learned within the last couple of weeks.

Early on, sculptures of people were very stiff and straight, and just lacked a certain element of realism.  Picture  early Egyptian sculpture:


The ancient Greeks figured out a way to make sculpture look a little more "human."  The technique they developed is called contrapposto.  The figure in the sculpture appears to have most of their weight on one leg, with the rest of their body aligned accordingly.  This gives the sculpture the look of person who was moving, and then paused for a moment.  Michelangelo's "David" is the perfect example of contrapposto in use.


Notice how Michelangelo seems to have captured an actual moment in David's life, rather than just having him pose for a sculpture.  I guess, if you compare photography and sculpture, the use of contrapposto would be like a candid photo rather than a portrait.

Ciao,
Donna

Wednesday, September 7, 2011

What's That Wednesday

Okay, today is "What's That?" Wednesday!  So, in honor of my 4th and 5th graders, who are all working on sculptures right now, here is a little info about different types of sculpture.


A sculpture that is free-standing, like a statue, is called sculpture-in-the-round.  This is because you can walk around it and see all sides of the sculpture.


A sculpture that is attached to a wall, so that you cannot walk around and see all sides, is called relief sculpture.  


One of my 4th graders, Samantha, said that you can remember that it is a relief sculpture by thinking about the sculpture leaning against the wall to get some relief.  What a smarty!


Monday, April 12, 2010

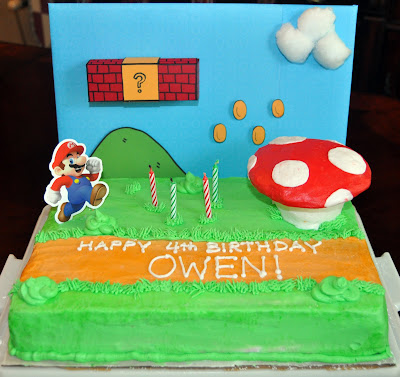
Super Mario Brothers Birthday Party

My oldest has turned 4...they grow up so fast!  Owen wanted a "Mario and Luigi" party for his birthday.  Being the procrastinator that I am, I waited too long and ran out of time to order party supplies online.  Here are my solutions:

I made the cake.  My mom always made my cakes when I was growing up, and as long as I am able, I'll make my kids' cakes (not that there's anything wrong with a "bought" cake--I actually enjoy cake decorating).


To make the background, I covered a cake board with blue scrapbook paper.  I drew the hill and coins on cardstock with with a Sharpie (one of my favorite tools!), cut them out, and attached them to the background with pop dots (sticky foam that make the pieces stick out).  For the blocks, I used cardstock to construct a box, drew on the bricks, attached the gold squares, and attached the box to the background.  The Mario is a sticker that I stuck on cardstock and cut out.  I taped toothpicks to the back and stuck him in there.  I got the sticker from a Mario magazine that I lucked into finding at Wal-Mart the day before I made the cake!

Here's my "Mario" with his cake:


I used eyeliner to draw mustaches on all of the kids (except the girls...they were NOT in to facial hair).

I wanted to get a pinata, but our local party store didn't have Super Mario anything.  Instead, I bought an Iron Man pinata (because it was already black around the sides) and I painted it to look like a chain chomp.

Here's me with the chain chomp pinata:


I also made the invitations for the party.  I made a scene similar to the cake on cardstock sized to fit those long envelopes.  I'll post a picture of those shortly...

Wednesday, March 17, 2010

Place mats! Whoo-hooo!

     So, I got this book called "The New Handmade: Simple Sewing for Contemporary Style," by Cassie Barden.  There are a lot of really neat things to make in there:  bags, iPod cover, cell phone case, composition book cover (with pockets!), laptop sleeve, and....place mats (among other things)!

     I have a nice dining room table and, along with being nice, it's also big.  I can't find a tablecloth long enough to fit it!  That's the main reason why I use place mats--so I don't have to be like some crazy table nazi, attacking people when they set their buttery knife down by their plate.  These place mats also have a pocket for the silverware; who cares what side the knife/fork/spoon should be on...just put it in the pocket!

     This past Saturday I was in JoAnn Fabrics and I found this cool Asian inspired print that I really like.  I love light blue and red together, so I marched right over to the red section, where I found this red fabric with irregular white polka dots.  Asian print + red with polka dots = super fun place mats!


Here's a close up of the pocket:


These place mats are also quilted.  Now, I am by no means going to start calling myself a quilter, but I think I did an okay job for my first time ever quilting anything.  I'm very pleased with my new place mats.  I can't wait to use them!  I had some of both fabrics left over, so I think maybe next I'll make a cell phone case--then maybe I can stop dropping my cell phone. : )

Donna